To create an out-of-office message in Microsoft Outlook to let your colleagues and clients know you won’t be reading or answering emails during that time period. This article has you covered for the process of Outlook out of office setup on multiple platforms, enabling it fast and nicely. Whether you are managing your inbox in Outlook on the desktop, the web, or from any mobile device, this listing will make it easy for you to let others know when you’re unavailable.
Also Read: How to Clear Microsoft Teams Cache
Why Use the Outlook out of office Feature?
An Out of Office Assistant in Outlook can send an automatic response to anyone who sends you an email message. This capability is especially beneficial for leave, business trips, and times when you are not readily available. Outlook out of office setup message ensures there are no false expectations. It can handle custom messages, time periods, and even different responses to internal contacts and to people from the outside world.
When configured correctly, it can also be a helpful tool to help your productivity when you get back, since people are getting immediate acknowledgment. Microsoft Outlook incorporates this natively throughout its services, and so is the best option for those working professionals out there.
Requirements for Outlook out of office setup
Things to check before configuring Outlook out of office. Before establishing the Outlook out of office setup, make sure you have:
- An active Microsoft Outlook account, Microsoft 365, Exchange, or standalone.
- An internet connection is required if you’re using Outlook on the web or a mobile device.
- Administrative Access if your account is managed by an organization.
The feature requires an IT administrator’s permission for Exchange accounts.
Step-by-Step Guide to set up Out of Office in Outlook on desktop (Windows)
Outlook out of office setup for Desktop. The desktop version of Outlook has some great options when it comes to the OOO. Follow these instructions:
- Open Outlook: Start Microsoft Outlook in your Windows system.
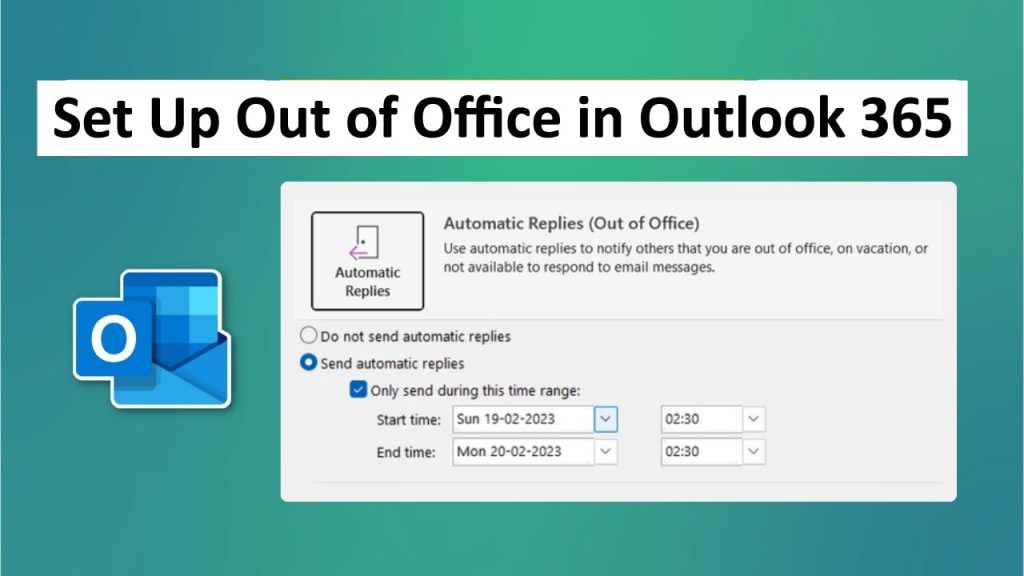
- Open Automatic Replies: Click the ”File” tab in the upper-left corner. Click “Info” from the sidebar, and then tap “Automatic Replies (Out of Office)”.
- Turn on the Feature: In the Automatic Replies dialog box, check “Send automatic replies”.
- Set Time Range: If applicable, select Only send during this time period. And both the beginning and end of a date or time interval.
- Craft Your Message:
- For internal contacts: Under the “Inside My Organization” tab, create an out-of-office message, such as “I’m away and will respond when I return on [date].
- For external contacts: Click on the “Outside My Organization” tab. Turn it on and write a brief answer, like ‘Thank you for your email. I’m out of the office until [date] and will respond as soon as I return.”
- Extra options: You may format text, add your signature, or ruler exceptions as required.
- Save and Apply: Press “OK” to enable. A notification should pop up in the status bar telling you it’s turned on.
This Windows out-of-office setup with Outlook usually takes less than five minutes. Verify it by simply emailing yourself from another address.
Outlook Out of Office on Mac
The Outlook out-of-office reply for Mac users follows a very similar process:
- Open Outlook on your Mac.
- Click “Tools” on the menu bar, followed by “Out of Office”.
- Select “Send Out of Office messages”.
- Set up the schedule and apply some messages for your organization or outside of it.
- Click “OK” to confirm.
- The layout is straightforward and similar to the Windows version.
Configure Out of Office in Outlook on the Web (OWA – Legacy)
Here’s how to set up Outlook OOF for browser-based access:
- Log In: Visit Outlook. Office. Com, then log in using your account information.
- Open Settings: Click the gear icon in the top-right corner and “View all Outlook settings”.
- From Mail: Go to Automatic replies.
- Turn It On: Flip the switch for “Turn on automatic replies.
- Schedule and Messages: Schedule the Date range, add it to your calendar if you like, and assign messages for Internal/External people.
- Save Changes: Press “Save” at the top.
This trick is suitable for portable use without any installation. It’s here that it’s all synced up with your account.
Mobile App: Set Up Your Out of Office in Outlook for iOS and Android
On mobile devices:
- Open the Outlook app on your iPhone or Android.
- Tap your profile icon in the upper-left.
- Specify with the gear icon.
- “Automatic replies” should appear under your account.
- Turn it on, schedule how long you want to use it, and set up custom messages.
- Save the changes.
Note that formatting options available in the mobile setup may be limited compared to those of the desktop.
Advanced Tips for Effective Outlook Out of Office Setup
- Personalisation: Add alternative contacts or emergency instructions to your message.
- Rules Integration: Integrate directly with Inbox Rules for forwarding of emergency emails.
- Testing: Always verify by emailing yourself.
- Turning it off: Don’t forget to turn it off when you’re back so you don’t keep getting your replies.
- Troubleshooting: If the feature is grayed out, Exchange Server might be necessary. Call 1-855-650-7555 for expert help.
For companies, some group policies might limit your choice ask your admin.
Common Problems in Out of Office message setup in Outlook
- Feature Not Available: Make sure you’re on an eligible plan, for example, Microsoft 365 Business.
- No outside responses: Turn it on in the settings.
- Sync Delays: Give it a few minutes or close and re-open the app.
- Error Messages: Update Outlook with the newest version available.
For consistent issues, the number to call for assistance is 1-855-650-7555 or you can visit Ms outlook site for further information.
Best Practices for Professional Out of Office Messages
Craft clear, concise messages:
- State your absence dates.
- Provide the return date.
- Offer alternatives if possible.
- Keep tone professional
Conclusion
KnowingOutlook out of office setup means smooth sailing when you’re on a break. Whether it’s desktop, web, or mobile, these steps are simple and work great. Apply these tips today to stay professional. Keep in touch with the power of Outlook.